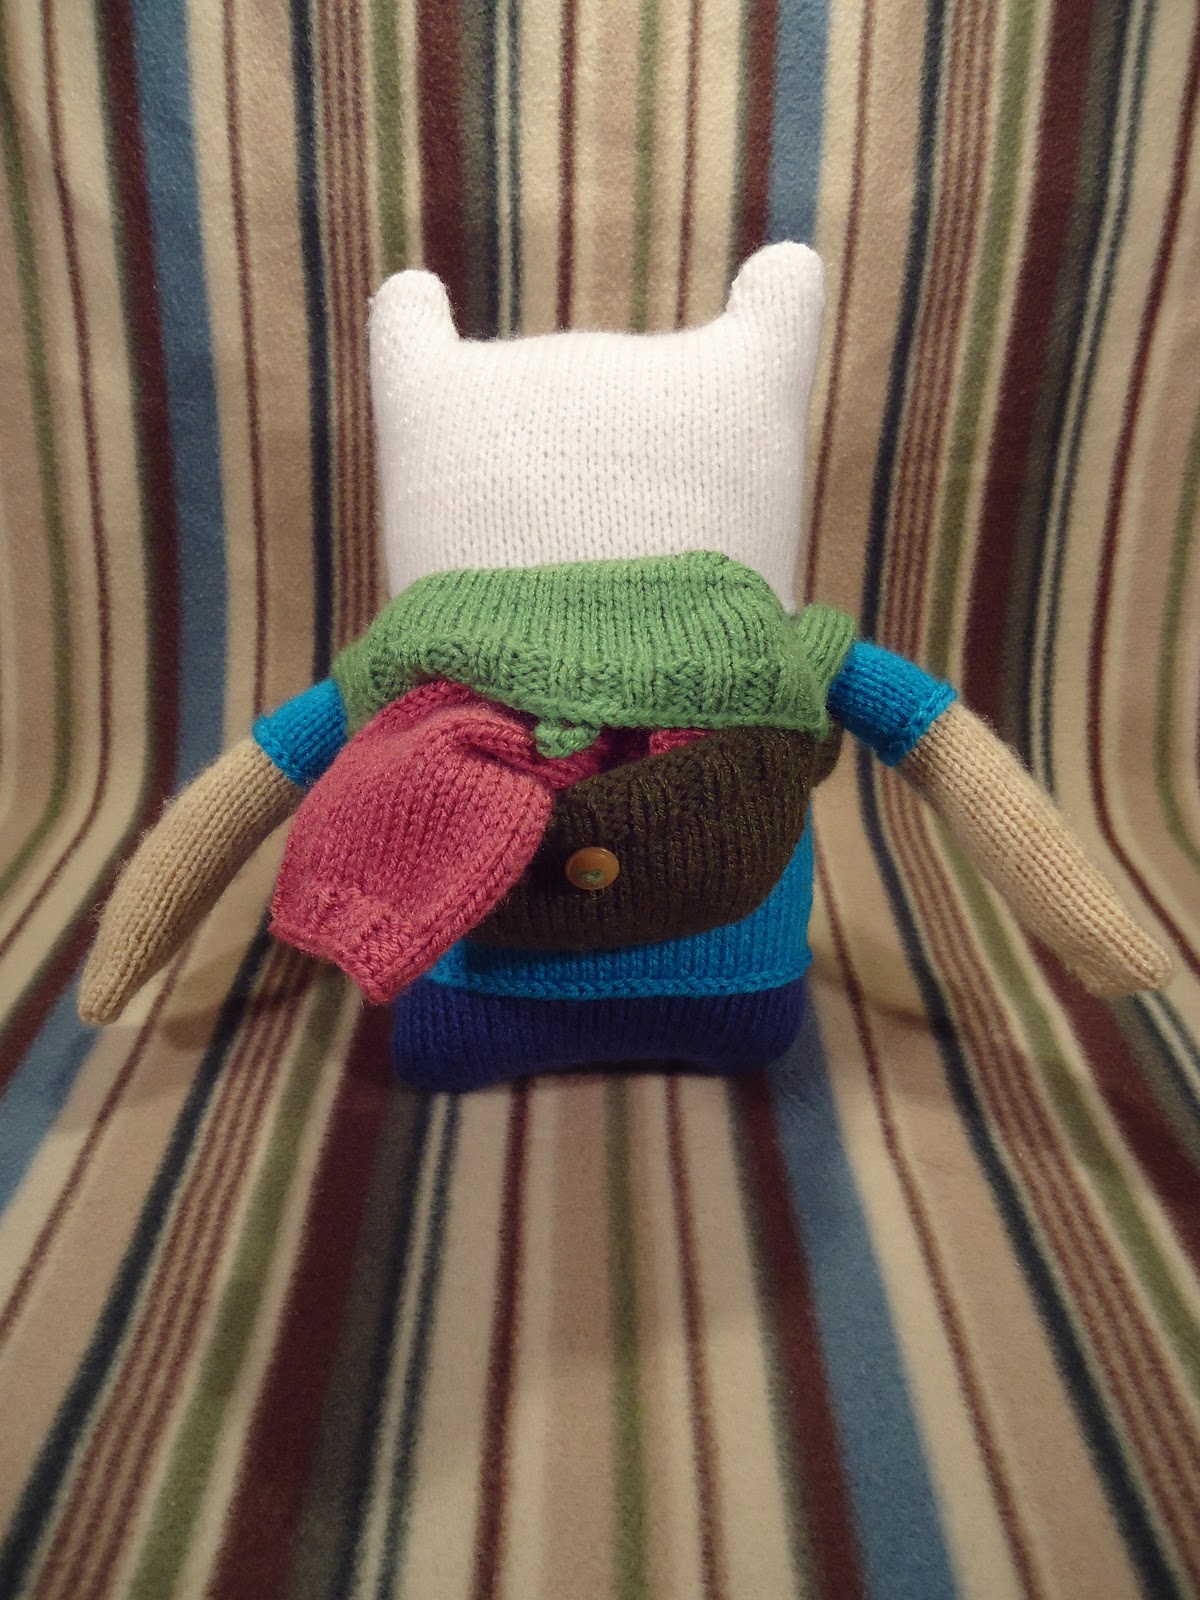
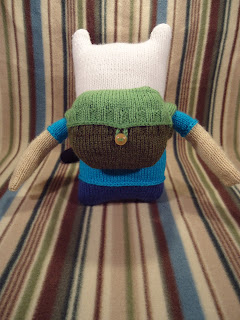
October 18, 2012

Anime Fusion

Exciting news!  This weekend I will be at my very first con selling my goods!  The convention is called Anime Fusion and is in the Twin Cities.  Come check me out if you are in the area!

Also, current Jake progress:

Mathematical!

October 17, 2012

Update Explosion!!

It's been a while!  I had a bit of a knitting slump in August, and then I have just been a bit lazy about knitting and posting things.  So here is a mega update!

First off, I finished a beautiful shawl.  The pattern is called Cladonia, and I decided to take this project on after seeing one of my knitting friends make it as well.  This is the first project that I have successfully blocked and I absolutely love it!  It's a great weight for fall.


(I apologize for the bad quality of this picture)
I also whipped up two hats from the book "Weekend Hats".  And because it's my favorite color, they are both green!  The beret is made with hand dyed yarn.


I didn't use quite the right type of yarn for this project, so the hat ended up a little floppy.


I made some hand warmers which have been wonderful for the cooler days.  They don't match but I think that gives them spunk. 


Last but not least, my mother requested this as a gift for a friend of hers.  It's very free hand and I didn't bother writing down the pattern as I went.  Anyways! I give you Gunter:


And along the lines of Adventure Time projects, no, I have not yet finished Jake the Dog.  I have been really lazy about that project...I will hopefully get to is soon. :)

July 17, 2012

Blue

I finished my hat for my friend!  It was a Navi hat!  I really like the way that the yarn I dyed worked out.  The hat ended up looking kind of pixel-y which worked really well since Navi is from a video game and all.  Anyways, here he is with his brother as Link at Comic-Con:


Here are some more images where you can see the hat a bit better.  I used some thin wire to hold the wings up, which worked quite well.


I recently got an itty bitty crochet hook and some embroidery yarn and tried my hand at making an little octopus!  It is super cute!  It made my hands hurt a lot to use the little hook, but it was worth it!  And then I turned it into a key chain!  Woo!


Also, I finally started to make Jake the Dog for my sister!  Hopefully I will finish it within the next two weeks.

June 29, 2012

Work Slowness

Both yesterday and today the program I use at work has been down.  This has resulted in me getting paid to knit, read books, and drink tea.  It's a pretty good deal.  Anyways, I figured since I had so much free time, I could post about my at-work project.  I basically just started this project because I wanted to try out a new stitch.  I found this one in a book I got from the library.  My current plans are to turn it into a tubular cowl that will wrap around twice.  I have a long way to go.


Knitting, book, and appropriate mug of tea!


June 28, 2012

Yarn Science!

A friend of mine requested that I make him a hat.  One of the specifications was that it go from blue to white.  So I took this as a great opportunity (and excuse!) to try some yarn dying science!! 
I got the beginner yarn dye kit from KnitPicks as well as some nice white wool and then I set up a lab in my kitchen and got to work!  I first separated some yarn out into 6 equal pieces and then loosely tied them together.  The thought was that I would pull out the sections at different times, and then the ones in the dye the longest would be the darkest.  I first soaked the yarn, made a dye bath, and then started to dye. 
This method worked out terribly.
The yarn in the dye pot got all tangled up and everything basically ended up being the same shade of blue except the one I pulled out after about 1 minute. You can see the results below.

Soak that yarn!

Now soak it in dye!
ermmmmm....

oh boy....
Ok, so I needed a new method to create a gradient from blue to white.  Luckily there is this thing called the internet and it showed me a different way to achieve my goal.  Method 2 involved rolling the yarn up into a ball, not soaking it in water, and then just sticking it straight into the dye.  So the idea is that the color gradually soaks up into the middle of the ball.
This method was much more successful as you can see!

After soaking for about 5 minutes

Yay!
There is actually a gradient!  It is still not quite what I wanted since it is a bit splotchy.  But this hat has a due date that is coming up rather quickly so it will do!

I am currently working on three projects right now as well as this hat.  I am still working on my 2nd Finn the Human, I am making (yet another) octopus, and I am knitting up a cowl at work during breaks.  But I have been finding myself rather busy this summer, so progress on all three of these projects is slow.
More post when I have finished them!


June 10, 2012

Balls

Narwhal complete!  I had originally planned for my narwhal to be a little longer and thinner, but it wasn't until I was about halfway down the tail that I realized that he was going to be pretty short and fat.  I didn't want to pull out my work, so I went with it.  I showed the finished body to my boyfriend, and he ended up dubbing it a "Narball", which was very appropriate!  (I also hummed this very appropriately themed song all week while I was making this).  Ultimately, the narball ended up being quite cute, even if his body is a little out of the ordinary.


I also made another Katamari!  I finished it in about a day!  Weekends are awesome!

La laaaaaa

la la la la la la la

Katamari Damacy


doo doo doo!

Song!

May 31, 2012

Look out! It's a Kraken!!!

Though, I have to say, this is probably the least threatening kraken I have ever seen. I mean,come on, look at how adorable it is!

Dawwwwww!

^__________^

So cute!

 My narwhal project (which is also very cute of course) is almost complete!  I just have to add it's horn and then I will post pictures!

May 26, 2012

Finished Octopus Hat


I figured it was about time to post pictures of the finished octopus hat since I actually finished it about two weeks ago.  I apparent had a brain fart when decreasing the top of the hat because it ended up way pointer than I wanted it to.  Fortunately, I was able to turn this around by folding the top down and securing it with a button (one of the many new buttons I recently obtained).  The button I picked fits the hat perfectly and I am kind of glad I goofed up, because I quite like the look of it.


I am currently working on two projects.  One is a stuffed Kraken (progress shown below).  The other is another Finn the Human, which I will be slowly making during my 15 minute breaks at work.  Speaking of work, my first two weeks have been good and I have found that I still have a decent amount of time for knitting in the evenings, which is very nice!


May 9, 2012

New Job and New Projects

I'm starting my new "real world" job this next Monday.  This has positives and negatives to it:
Positive: More money = more yarn.
Negative:  Less time to actually knit
So, there may be a decrease in the number of projects finished per month now. :(

Speaking of projects, I am currently super into octopi!  I keep making little stuffed octopi...

 
Woo!


And am finishing up my intarsia octopus hat (I am not looking forward to sewing in all the loose ends O.o).  After that I have plans to make a stuffed Narwhal, and then perhaps a Kraken from the same book I got the stuffed octopus pattern from.  Stay tuned!

April 29, 2012

BUTTONGASM!


April 28, 2012

Finn the Human


Finn the Human


Materials:
Size 3 (3.25 mm) straight knitting needles
Size 5 (3.75 mm) double pointed needles
Yarn:  One skein each of Vanna’s Choice yarn in White, Rose, Aqua, Colonial Blue, Beige, Fern, Black, and Olive.  About a yard of purple yarn in worsted weight.
Tapestry Needle
2 medium sized eyes
One button
Stuffing

Notes:
Inc: Knit/Purl front and back
Dec: Knit/Purl two together
When sewing together pieces, use the invisiblehorizontal/vertical seam methods.
I find that the cable cast on method works best for this project.

Legs:
Using Black and straight needles, cast on 18 stitches
R1) Knit
R2) P1, inc, P17 (19 st)
R3) Knit
R4) P1, inc, P18 (20 st)
R5) Knit
R6) Purl
R7) Knit
R8) P1, dec, P18 (19 st)
R9) Knit
R10) P1, dec, P17 (18 st)
R11) Knit
R12) Cast off 8, P10 (10 st)
Continue in stockinet stitch for 8 more rows with Black.
Switch to Beige
Continue in stockinet stitch 30 rows
Switch to Colonial Blue
Continue in stockinet stitch 11 rows

Cut yarn and move all stitches to a stitch holder.

Make another leg, but this time read all rows backwards like so:
R1) Knit
R2) P17, inc, P1
R3) Knit
R4) P18, inc, P1
Etc...
Keep the second leg on the straight needles and do not cut the yarn.

Body:
(Continue working on the second leg)
R1) K10, Cast on 15 st, place first leg from stitch holder onto needles, K10 from first leg (thus connecting the two legs into one piece) (35 st)
Continue 14 more rows in stockinet stitch with Colonial Blue
Switch to Aqua
Continue in stockinet stitch for 35 rows
Switch to White
Continue in stockinet stitch for 5 rows
Knit (stockinet stitch) the next 19 rows using the Face template and Beige yarn.
Face Template
Continue in stockinet stitch for 6 rows with White

Ears:
(Continue working on the Body)
R1) K8, Cast off 19 st, K8
R2) P8, put the other 8 stitches onto a stitch holder
Continue in stockinet stitch for 5 more rows, then cast off.

Pick up the 8 stitches form the stitch holder.
Continue in stockinet stitch for 6 more rows, then cast off.

Repeat the Legs, Body, and Ears section once more.  Only this time, instead of working the Face Template, just work 19 rows in White.

Assembling Finn:
Begin sewing the two sides of Finn together starting at the feet.  Sew together the boot sections of his feet but don’t go much further.  If you continue to sew together the rest of his legs it will make it more difficult to sew on his socks.

Socks (Make 2):
Using the double pointed needles and White yarn, make a 5 stitch I-cord 30 rows long. 
Before casting off your I-cord, first check to make sure it fits around Finn’s leg.  I stuffed Finn’s boots to make sure it was long enough before I cast off.
Once making sure the I-cord is long enough, cast off.  Sew the two ends of the I-cord together and then sew the cord onto Finn’s leg where the top of his boots meet his legs. 

Next, sew together the two sides of Finn until you reach slightly above the bottom of his shorts.  At this point you want to embroider the bottom of his shorts with a chain stitch using the Colonial Blue yarn. 
Continue to sew the two halves together, embroidering at the bottom of the shirt with Aqua, and at the bottom of the hat with White.  Chain stitch with White yarn along the outside of the face. 
Do not start to sew together the ears or the top of the head yet.

Arms (Make 2):
With straight needles and Aqua, cast on 19 stitches
 Work in stockinet stitch for 15 rows in Aqua
Switch to Beige
Continue in stockinet stitch for 35 rows

Cast off.

Sew together the two long edges of the hand, making sure to stop and chain stitch the bottom of the sleeve in Aqua along the way.  Sew the bottom of the arm together such that the seam from the long edges is in the middle bottom part of the hand (see figure on left below).  Once the bottom of the hand is sewn up, stuff the bottom of the arm.  Next sew two 1 inch sections at the bottom of the arm, such that the appearance of fingers is achieved (see figure on right below).


Stuff the rest of the arm and then sew it onto the body just slightly under the bottom of the white hat.  To do this, I first sewed the top of the arm in place using invisible horizontal seam method and then sewed the bottom on about two rows under that.  This joint should not be heavily stuffed in order to allow for more movement.

Once both arms have been sewn onto the body, add facial features.  Place the eyes where they look good to you, and then add a mouth using a basic back stitch.

Stuff the body and then continue sewing the two halves of Finn together.  Continue stuffing as you sew together the ears and top of head.  Tie off the ends and hide them inside the body.

Backpack:

Back:
Using Dark Olive yarn and straight needles, cast on 25 stitches
R1) Knit
R2) P1, inc, Purl to last two stitches, inc, P1 (27 st)
R3) Knit
R4) Repeat row 2  (29 st)
R5) Knit
R6) Repeat row 2 (31 st)
R7) Knit
R8) Repeat row 2 (33 st)
R9) Knit
R10) Repeat row 2 (35 st)
R11-R18) Continue in Stockinet Stitch
Switch to Fern
R19-R26) Continue in Stockinet Stitch
R27) K1, dec, Knit to last three stitches, dec, K1 (33 st)
R28) Purl
R29) Repeat row 28 (31 st)
R30) Purl
R31) Repeat row 28 (29 st)
R32) Purl
R33) Repeat row 28 (27 st)
R34) Purl
R35) Repeat row 28 (25 st)
R36) Purl

Cast off.

Bottom Front:
Using Olive and straight needles, cast on 25 stitches
R1) Knit
R2) P1, inc, Purl to last two stitches, inc, P1 (27 st)
R3) Knit
R4) Repeat row 2  (29 st)
R5) Knit
R6) Repeat row 2 (31 st)
R7) Knit
R8) Repeat row 2 (33 st)
R9) Knit
R10) Repeat row 2 (35 st)
R11-R18) Continue in Stockinet Stitch
R19-R23) Work in K2, P2 ribbing

Cast off.

Upper front:
Using Fern and straight needles, cast on 25 stitches
R1) Knit
R2) P1, inc, Purl to last two stitches, inc, P1 (27 st)
R3) Knit
R4) Repeat row 2  (29 st)
R5) Knit
R6) Repeat row 2 (31 st)
R7) Knit
R8) Repeat row 2 (33 st)
R9) Knit
R10) Repeat row 2 (35 st)
R11-R13) Continue in Stockinet Stitch
R14-R18) Work in K2, P2 ribbing

Cast off.

Backpack Straps (Make 2):
Olive and straight needles, cast on 12 stitches
Work in stockinet stitch for 24 rows
Switch to Fern
Work in stockinet stitch for 24 rows

Cast off.

Sew Backpack back, upper front, and lower front together.  Make sure that the upper front is sewed on over the bottom front.  Sew on arm straps close to the edge of the Backpack.  I ended up sewing the ends of each strap very close to each other as well.  Sew on button and then sew on a crocheted or braided cord for a button loop.

Like-Like Sweater:
Using Rose and the double pointed needles, cast on 72 stitches and distribute them onto the three needles
Work 4 rows in K2, P2 ribbing
Work 27 rows in stockinet stitch

Forming arm holes:
Cast off 10 stitches, K26, cast off 10 stitches, K26
Cast on 10 stitches, K26, cast on 10 stitches, K26

Continue in stockinet stitch for 4 more rows
Work 4 rows in K2, P2 ribbing

Cast off.

Sweater Sleeves:
Pick up 24 stitches from the arm hole with the DPNs and distribute them onto the three needles
Work 3 rows in stockinet stitch
*K3, inc, repeat from * until end of row (30 st)
Work in stockinet stitch for 33 rows
*K3, dec, repeat from * until end of row (24 st)
Work 4 rows in K2, P2 ribbing

Cast off.

Sew in loose ends.  Stitch a heart with purple yarn in the top right corner of the front of the sweater.

Now you have your very own Finn the go on adventures with! Enjoy!

April 27, 2012

Intarsia

I decided to do my first intarsia project...I might have been a little too ambitious.  It's ultimately going to be a hat with an octopus on it, but it mostly just looks like a flying spaghetti monster at the moment.


I continue to do a few rows a day, but I can't take too much more than that without going crazy.

April 22, 2012

Oh my glob, he is so cute!

Finished Finn the Human!  Super pleased with how everything turned out! 

 The Finn!

 The backpack!

 But what's inside?

 Awwww, his sweater from Princess Bubblegum!

Mathematical!

April 17, 2012

Dat Octopus

Finished up my octopus (pattern from the book Amigurimi Knits)! His legs are bendy and twisty and he is very friendly. :)


Also completed my Finn the Human from Adventure Time! I am still planning on making his backpack and pink heart sweater that he got from Princess Bubblegum.