March 28, 2012

Steam it up!

I finally finished the shirt for my steampunk outfit! This is probably the best job I have done when it comes to sewing. There is only one real big mistake, and you cant see it.


The end of the sleeve.

I learned to use the sewing machine to make button holes! It's very handy.

I am going to a convention this next weekend and will get pictures of me in the whole get up then. I will post it soon!

I also did some leather work and spiffed up the bands on my steampunk goggles. It used to be black and blue elastic, but now it looks way better. Took pics of it on my boyfriends pop up top hat. I usually just wear these on my head.


Also, cool news! My blog has now had over 11,ooo views! Most of them are views of my Beartato and Reginald patterns from Ravelry and Crochet Patterns Central. It makes me feel cool!

March 22, 2012

Experiments

I have been recently been zooming round the internet and found a couple of different knitting tutorials for things I hadn't tried before, so decided to see what they were all about.

One was double knitting, which has always seems super helpful for making nice looking scarfs. So I gave double knitting a try. It was pretty easy, but I tended to knit a little loose. These are my results:


I also did some intarsia, which is more difficult than double knitting. I probably did a more intricate pattern for having it be my first try, but it turned out alright. One thing about intarsia that is frustrating is that there are sooooo many loose ends and bits of yarn! It's crazy! Anyways, here is my tester piece:


The back is super messy! Not something you would want to have showing. But it was a very useful thing to learn as I have often run into issues working with multiple colors that this method would solve.

March 21, 2012

Winter Hats in Spring

I ended up making some hats just in time for 80 degree weather! Woo!
I first made the hat Long Leaves Beanie from the book "Weekend Hats". I used some Red Heart Super Tweed yarn that I had been wanting to use for quite a while. The yarn coloring made it so that the pattern didn't turn out as clear, but you can still see it. This is going to be a hat for a friend of mine, but I will probably give it to her on her birthday, or Christmas or something.


This picture was taken without flash and better shows off the pattern.

After making this hat, I was in a hat mood, so I decided to try my hand at an original hat pattern. I first made a sketch, and then tried it out with some scrap yarn.

Little practice pieces!

Then I sketched out a better pattern. It's super sloppy, but I could read it.

Then I went on the making the actual hat! I got to use a really pretty mustard yellow color (called Pea Green for some reason). Everything worked well! Though, I do have to say, that this hat contained the most annoying row I have ever had to do: cable, cable, cable, cable, k6, make bobble, k7 repeat. Blech, not fun! And I wrought it upon myself! But it was totally worth it! The hat turned out amazing! (I plan to sell this on Etsy whenever I get my store up)

I call it my "Hint of India" hat!

Taken without flash, so you can see the pattern better.

So overall it was a very successful hat week. I plan to next work on finishing my shirt for my steam punk outfit. It is so hard to go back to a project that you haven't worked on, but I would like to have it finished by the end of the month so that I can wear it to an anime convention. We shall see what happens!

March 18, 2012

Yarn Science

So, I've been thinking a lot recently about trying to dye my own yarn. I have stumbled upon quite a few sites that describe how to do it with both Kool-Aid and yarn dye. I'm thinking of purchasing some dye and dyeable yarn from Knit Picks (which is a super awesome store).
It looks like dying your own yarn involves soaking, boiling, mixing, and stirring. Basically, chemistry in your kitchen with yarn! Sounds pretty awesome to me!

Though, as much as I want to do this, I really don't need any more yarn at the moment. I have run out of storage space for all of my yarn, and have resorted to putting some of it under the couch. I figure I should probably try and use some of that up before running out and purchasing more just for fun.

But soon, soon I will experiment!

Also, I totally want this sampler from Knit Picks because OMG COLORS! But the same storage/use issues apply. Also it's over 300 dollars.

March 17, 2012

The more you know...

TIL that when you "slip 2, knit 1, psso", you slip the first two stitches at the SAME time, NOT one at a time.
This makes everything look much nicer.

I don't know why it took me so long to figure that out...

March 15, 2012

Beartato Pattern


Materials:
Crochet Hook Size G
Main Color: TLC Essentials in Taupe (1 skein)
Secondary Color: Any black yarn of Worsted Weight (1 skein)
Tapestry Needle
Sewing Needle and black thread
Black, White, and Light Tan Felt
Stuffing
Some sort of stitch marker. I prefer to use the method found here.

Ears (Make 2):
R1: With main color, sc 6 using magic ring method
R2: sc2 in each stitch around (12 sc)
R3: [sc1, inc] 6 times (18 sc)
R4: [sc2, inc] 6 times (24 sc)
R5-R6: sc in each stitch around
R7: [sc2, dec] 6 times

Body:
R1: With main color, sc 6 using magic ring method
R2: sc2 in each stitch around (12 sc)
R3: [sc 1, inc] 6 time (18 sc)
R4: [sc 2, inc] 6 times (24 sc)
R5: [sc 3, inc] 6 times (30 sc)
R6: [sc 4, inc] 6 times (36 sc)
R7: [sc 5, inc] 6 times (42 sc)
R8: [sc 6, inc] 6 times (48 sc)
R9: [sc 7, inc] 6 times (54 sc)
R10: [sc 8, inc] 6 times (60 sc)
R11: [sc 9, inc] 6 times (66 sc)
R12: [sc 10, inc] 6 times (72 sc)
R13: [sc 11, inc] 6 times (78 sc)
R14: [sc 12, inc] 6 times (84 sc)
R15: [sc 13, inc] 6 times (90 sc)
R16-R46: sc in each stitch
At this point, you want to add the ears (folded flat) and face. 
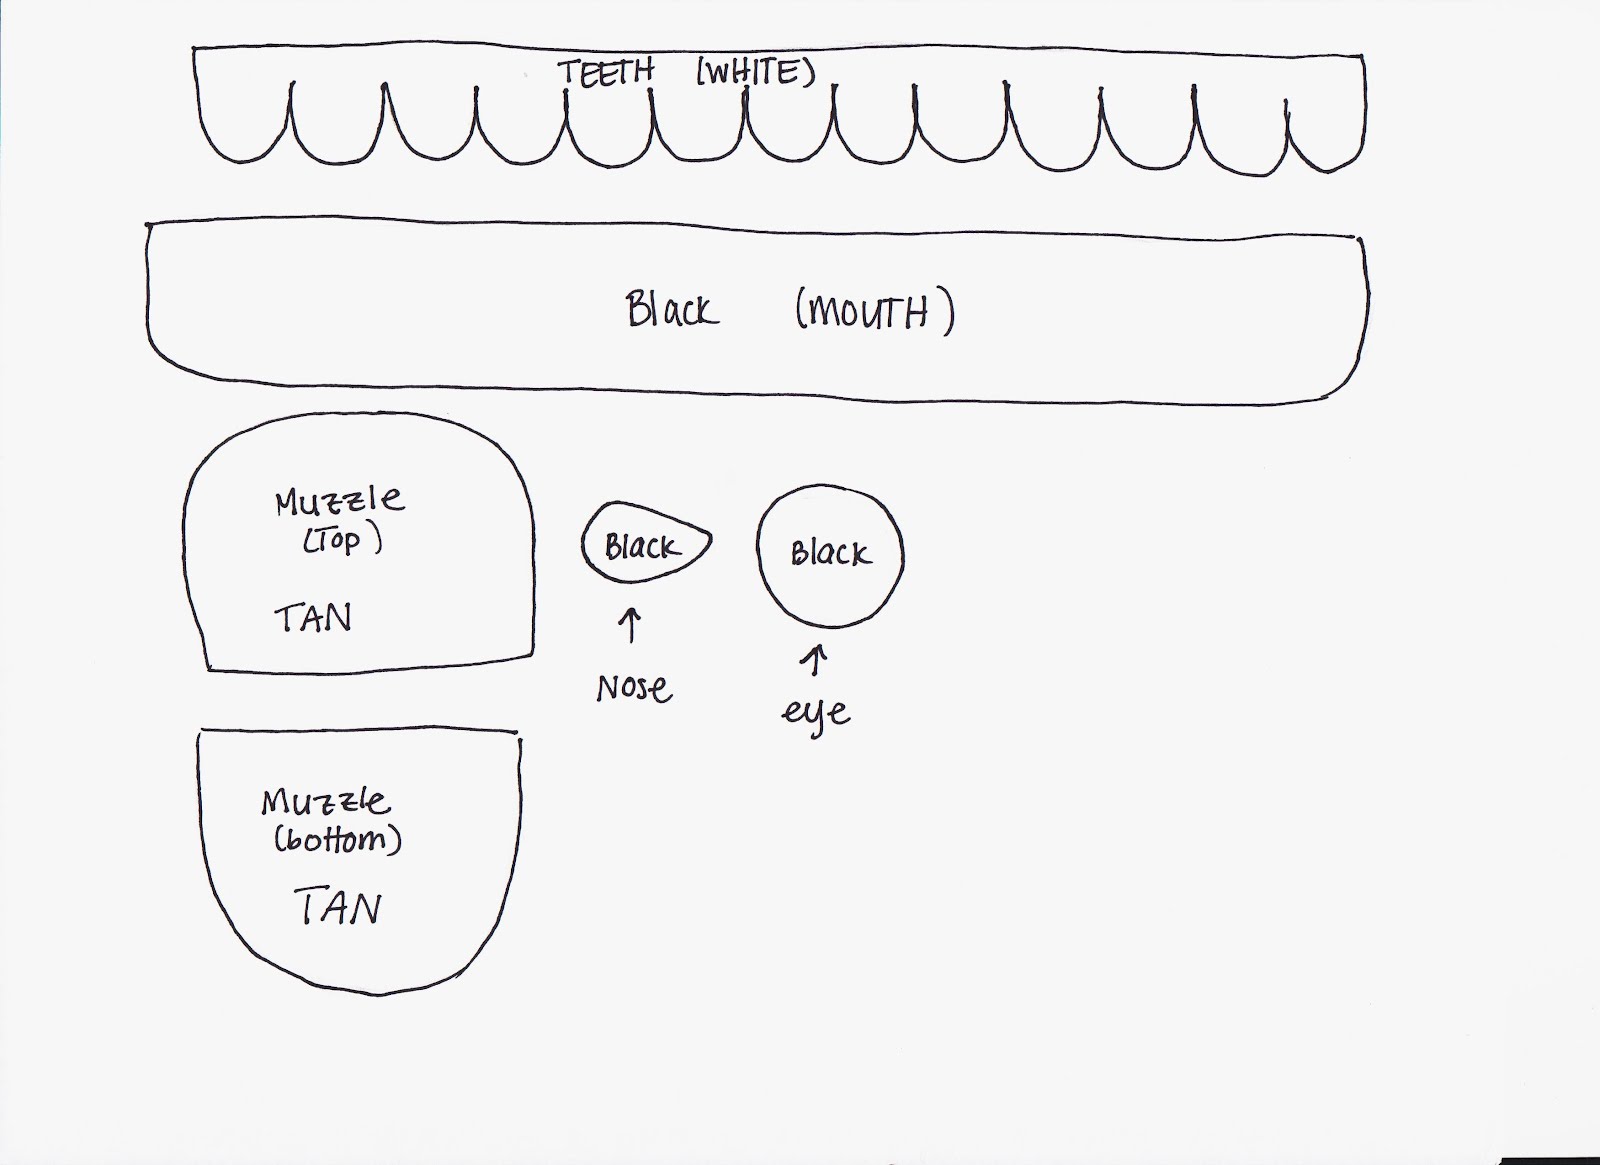
Using your felt, cut out Beartato’s face pieces according to the template to the left (Please note the template is not perfect. It should be used to give you a general idea of shape and size, so edit as you see fit). Using your needle and black thread, sew on his face (order: muzzle top and bottom, nose, mouth, teeth, eyes). As far as placement is concerned, just sew things on where you think they look good. When I did it, the top of Beartato’s mouth (top of the black felt) fell between rows 30 and 31, the eyes just a row and a half above that.
R47: [sc 13, dec] 6 times (84 sc)
R48: [sc 12, dec] 6 times (78 sc)
R49: [sc 11, dec] 6 times (72 sc)
R50: [sc 10, dec] 6 times (66 sc)
R51: [sc 9, dec] 6 times (60 sc)
R52: [sc 8, dec] 6 times (54 sc)
R53: [sc 7, dec] 6 times (48 sc)
R54: [sc 6, dec] 6 times (42 sc)
R55: [sc 5, dec] 6 times (36 sc)
At this point you probably want to start stuffing your Beartato. Continue stuffing until you are satisfied over the next few rows.
R56: [sc 4, dec] 6 times (30 sc)
R57: [sc 3, dec] 6 times (24 sc)
R58: [sc 2, dec] 6 times (18 sc)
R59: [sc 1, dec] 6 times (12 sc)
R60: decrease 6 times (I find that decreasing at the end gets difficult and doesn’t look good, so just decrease enough so that the hole at the bottom can be decently sewn up)
Tie off and sew in loose ends making sure that there are no holes toward the end.

Arms (Make 2):
R1: With secondary color, sc 8 using magic ring method
R2: sc 8
Repeat Row 2 until piece is about 5 inches long.
At this point, you want to crochet the end of the arm together. To do this, squish together the end of the arm that you are working on such that there are 4 sc on one side and 4 on the other with the thread coming out of an edge. Then sc 4 on one side while also sc through the 4 on the other, closing the arm. (See picture)
Fingers:
Slip stitch into the first of the four remaining stitches.
Chain 4, turn work
Skip the last chain you made, and then sc in the first three chains
Slip stitch into the next sc on the arm (second of 4)
Repeat until you have 3 fingers.
(I know this part is kind of confusing. What you end up with is three fingers that are flat and made out of a chains and single crochet. It’s like the first row of a crocheted scarf: you chain a length, skip the last chain, and then continue to sc the rest of the length back. But in this case it is very small)

Legs (Make 2):
R1: With secondary color, ch 2 and then sc 4 times into the first chian.
R2: sc twice into each stitch (8 sc)
R3: sc 8
Continue to repeat Row 3 until the leg measures around 4 ½ inches long.
Shape the foot my sewing a bend into it at about row 5.
Attach arms and legs. I sewed the legs onto the body a little over an inch apart. I sewed the arms on at the very edges of the mouth and slightly above it.
And with that you have a Beartato! Please let me know if you run into any problems. I am still very new to pattern writing and I know how I explain some things can be confusing.

The tale of the Mittens

One day a few weeks back, I needed to go shopping. This day was a rather ugly day, as slush was raining down from the sky. So, to prepare for the cold on my car ride to the store, I donned my fish hat and Newfie mittens.
I had two stops to make on this particular outing, one at Walgreens, and one at Copps, a local grocery store. Now, these two stores are quite close to each other, and upon leaving the Walgreens, I decided to not wear my mittens as I would only be in the car for a brief period.
Anyways, I read Copps and start to do my shopping. About half way through I realize that my mittens are no where in sight. I search my pockets, bag, and shopping basket. No luck. I then figure that I must have left them in the car. I continue my shopping and leave the store.
I get to the car and drop off the groceries, and then start to look for my mittens.
I can't find them.
I go back into the store and look. No luck. I ask the service desk. No luck.
I give up looking for the day.
Two days later I decided to give it another try. I ask both stored if they had my mittens in their lost and found. They did not. I looked all over the parking lots, as I might have dropped them whilst trying not to step in the slushiest part of the lot. There were not mittens to be found.
It was then that I decided to deem them MIA, presumed dead. :(


Having greatly loved these mittens, I decided to make another pair. Hopefully they will serve me as dearly as did my previous pair. Here is what they look like:


March 11, 2012

Gifts Received!

Some pictures of my knitted gifts with their new owners!

Helena with Tree Trunks,

and Asher on his new blanket!

March 6, 2012

Catan Blanket 2

It's done! The baby blanket is completed! It turned out wonderfully!


Also, recursion! (And our couch area because I think it's pretty cool!)

March 4, 2012

Tower of Hexagons

So, it turns out that making small hexagons takes a lot less time than large ones. I have finished making the hexagons for the Baby Catan Blanket in less than a week! (When I made this blanket (larger) in the past it took weeks to crochet the hexagons. )

I have started to sew the pieces together and will probably be done either later tonight or sometime tomorrow! I will post pictures of the final project then!